ConnectWise Manage Setup
Written By Victor Raessen
Last updated 20 days ago
Part of the PSA Setup Guides. See also: Autotask | HaloPSA
Prerequisites
Before you begin, ensure you have:
Administrator access to ConnectWise Manage
Permission to create API Members and Security Roles
Access to your Salesbuildr Dashboard
A secure location to store API keys
Before you connect: prepare your product data
Once you connect ConnectWise to Salesbuildr, an initial sync runs and your product catalogue is imported. If your product data has structural issues at that point, they will carry over and can be harder to correct after the fact. It is worth spending a few minutes on the items below before completing the connection.
MPN fieldSalesbuildr links products to distributor catalogues using the Manufacturer Part Number (MPN). Make sure each product's MPN is stored in the dedicated MPN field in ConnectWise — not in the Product ID field or the description. Products without a correctly placed MPN will not match to distributor pricing automatically.
Billing terms — pick one field and use it consistentlySalesbuildr reads billing frequency (monthly, yearly, one-off) from either the Billing Frequency field or the Unit of Measure field. Both are supported, but you must use one consistently across all products. If some products use Billing Frequency and others use Unit of Measure, the import will produce unreliable results. We recommend Billing Frequency. If your team has historically used Unit of Measure, that works too — just make sure there are no exceptions.
Product Type structureIn Salesbuildr, you set a data source per Product Type — either ConnectWise or Salesbuildr. For hardware, Salesbuildr is typically the right source because of its distributor connections. For services, ConnectWise often holds the correct data. Product Types that contain a mix of hardware and services cannot be assigned a single clean data source. Review your Product Types in ConnectWise and split any mixed types before connecting.
Category structureIf you are planning to reorganise your ConnectWise categories in the coming weeks, do that before connecting. Category changes after the connection is live will break existing mappings, which then need to be rebuilt manually. If a restructure is further down the road, there is no need to delay — you can connect now and revisit categories
⚙️ Part 1: Setup in ConnectWise Manage
💼 These steps are performed inside your ConnectWise Manage account.
🔐 Step 1 – Create a Custom Security Role in ConnectWise
Creating a dedicated security role for Salesbuildr (rather than using the Admin role) provides better security and control.
💡 Note: No additional Manage license is required to assign a security role to an API Member.
👉 To create the role:
Go to System > Security Roles
Click + New to create a role (e.g.,
Salesbuildr Integration)Apply permissions as listed below in next section:
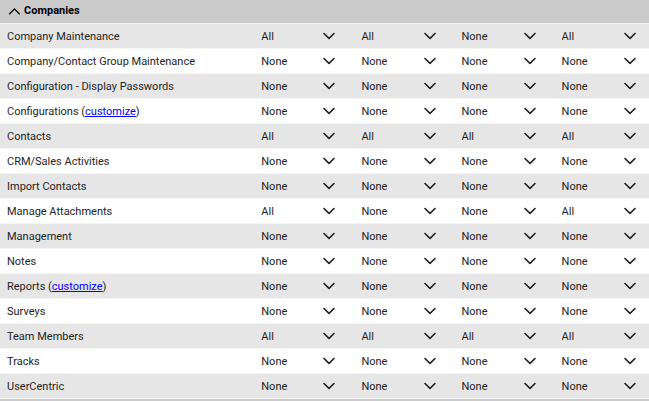
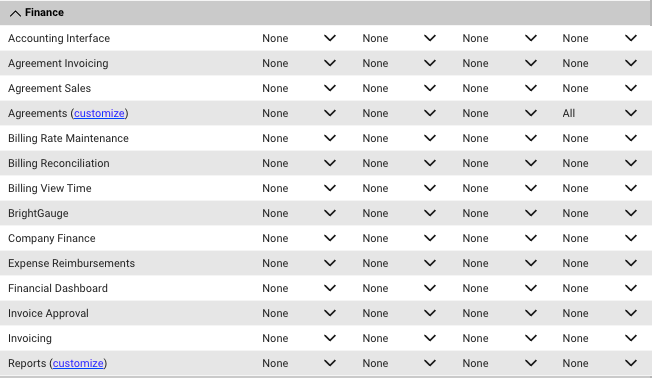
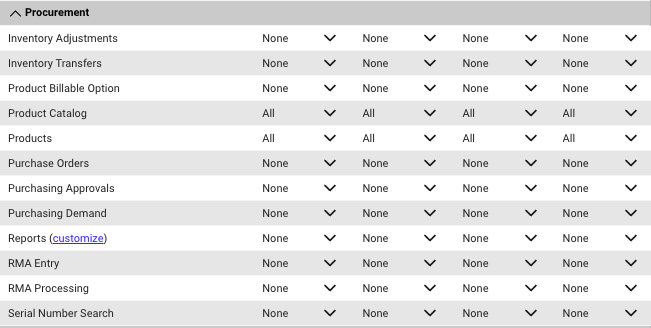
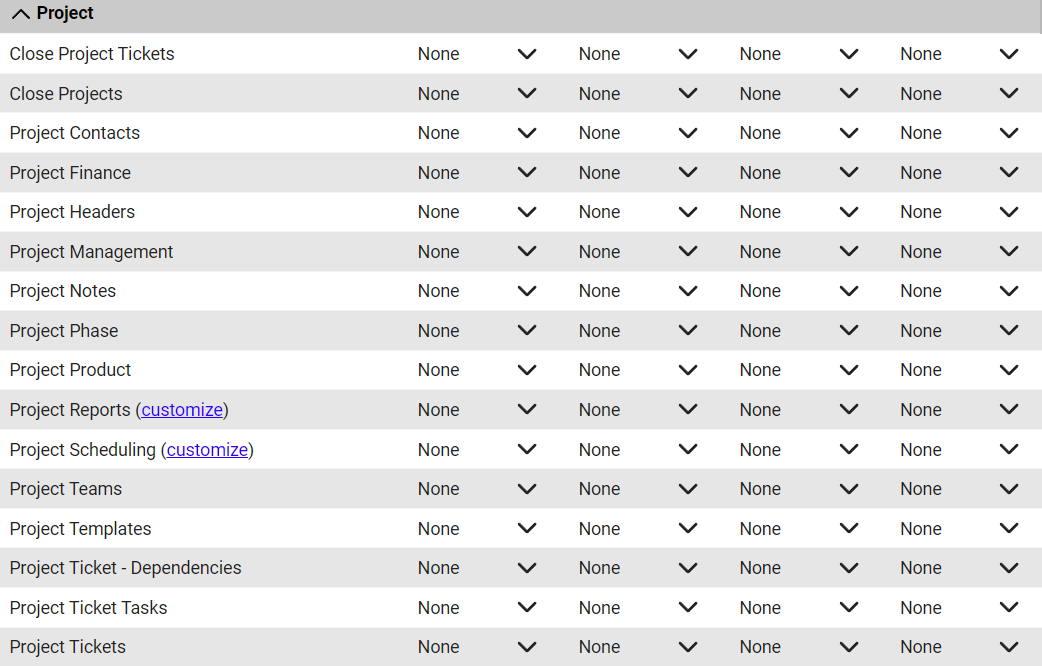
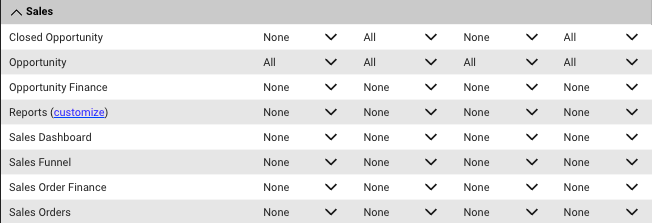
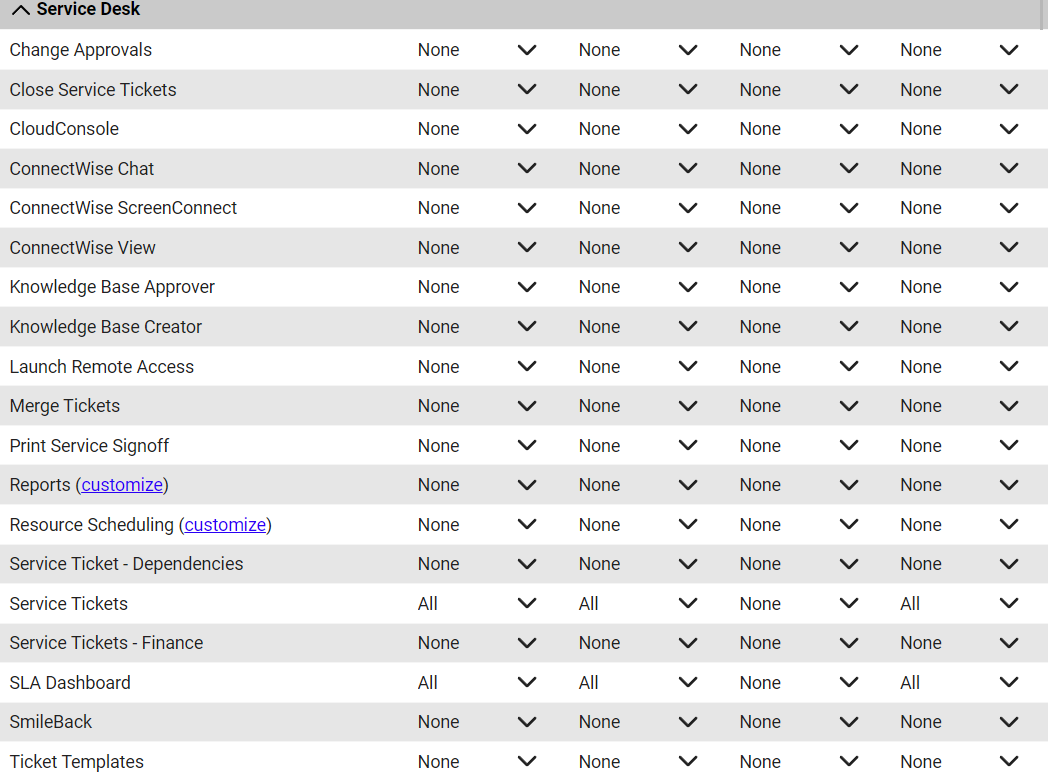
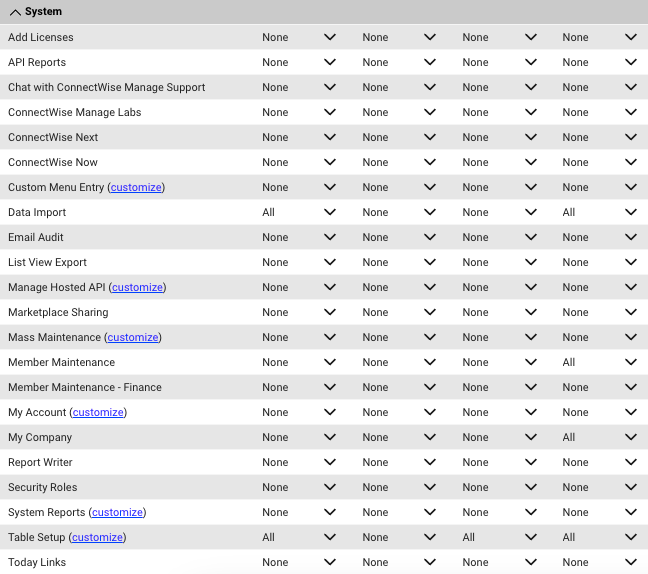
🔧 Required Permissions by Module:
Configure these 8 modules with the permissions shown in the screenshots below:
1. Companies
2. Finance
3. Marketing

4. Procurement
5. Project
6. Sales
7. Service Desk
8. System
4. Click Save to create the security role
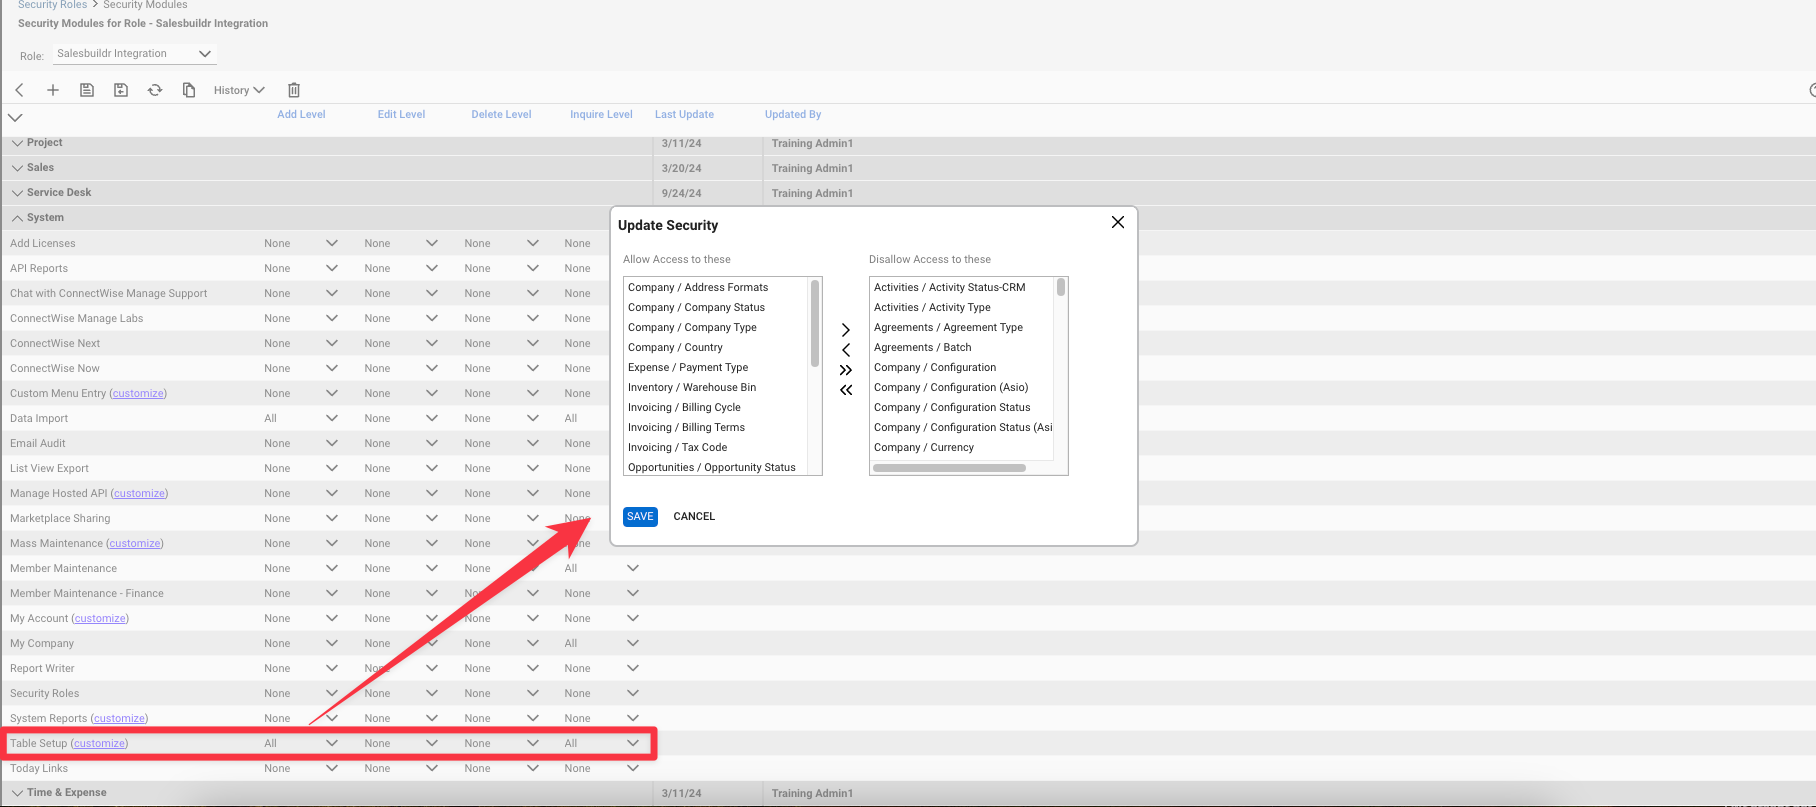
🔌 Step 2 - Table Setup
Table Setup determines which entities are accessible through the API. You'll need to make specific tables visible for the integration to function properly.
Navigate to System > Table Setup
Click Customize
Ensure the following 23 entities are visible in the left-hand list:
Company Module:
Company / Address Formats
Company / Company Status
Company / Company Type
Company / Country
Company / Team Role
Expense Module:
Expense / Payment Type
Inventory Module:
Inventory / Warehouse Bin
Invoicing Module:
Invoicing / Billing Cycle
Invoicing / Billing Terms
Invoicing / Tax Code
Opportunities Module:
Opportunities / Opportunity Status
Opportunities / Sales Probability
Opportunities / Sales Stage
Opportunities / Sales Teams
Opportunities / Opportunity Type
Products Module:
Products / Category
Products / Manufacturers
Products / Product Type
Products / Subcategory
Service Module:
Service / Priority
Service / Service Board
Service / Severity
Service /SLA
4. Click Save to apply changes
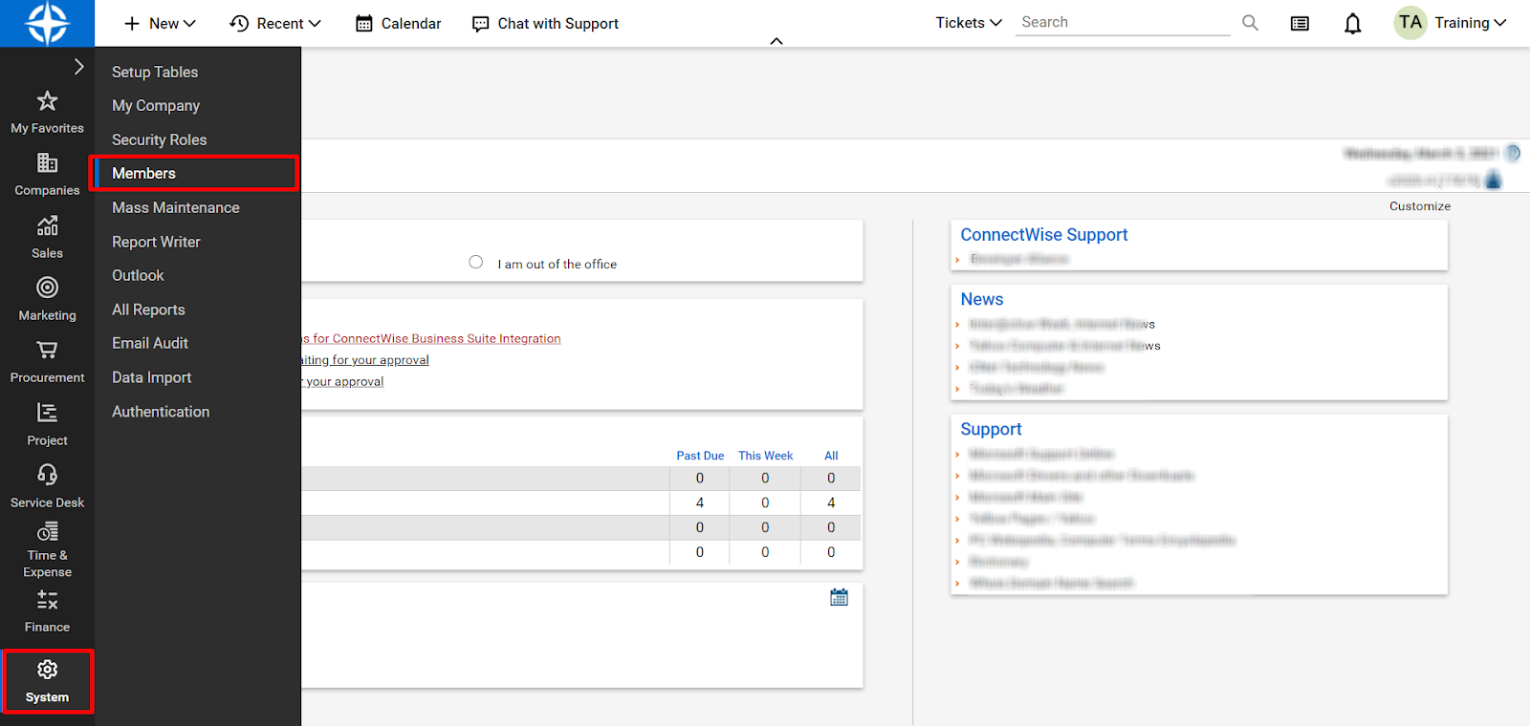
👤 Step 3 – Create the API Member
The API Member serves as the authentication account for Salesbuildr to access your ConnectWise data.
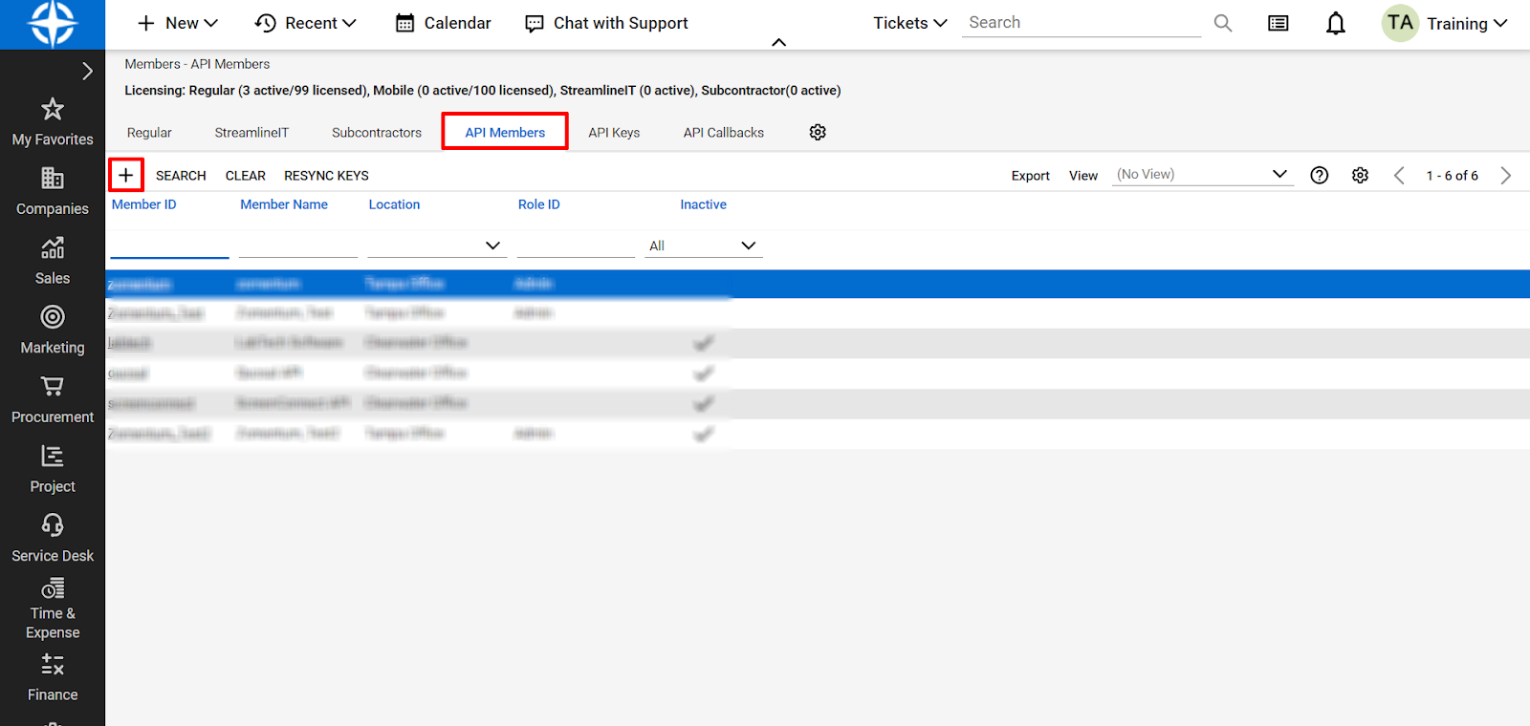
Navigate to System > Members
Open the API Members tab
Click + New Item
Configure the following fields:Member ID:
SalesbuildrMember Name:
SalesbuildrRole ID: Select the custom security role in the Role ID drop-down that contains the correct Manage permissions needed. We recommend using the Custom Security Role that was created in the previous steps.
Level: Select
Corporatein the Level and Name drop-downs. Selecting Corporate (Level 1) is generally the most appropriate and provides the most access to companies in Manage that is needed for the Salesbuildr integration.Location: Any (this does not affect integration)
Default Territory:
Corporate
Click Save and Close.

🔑 Step 4 – Generate API Keys
API keys authenticate Salesbuildr's connection to ConnectWise. You'll need both keys to complete the integration in Salesbuildr.
Open the API Member you just created (
Salesbuildr)Navigate to the API Keys tab
Click + New Item
Enter a description:
Salesbuildr IntegrationClick Save
You’ll now see:
Public Key
Private Key (only visible once)
⚠️ Store both keys securely (e.g., in a password manager). You’ll need them during integration, and the Private Key cannot be retrieved again.
Now go to Salesbuildr to complete the integration by entering the Public Key, Private Key, and Site URL.
⚙️ Part 2: Setup in Salesbuildr
🧩 Complete these steps in your Salesbuildr Dashboard.
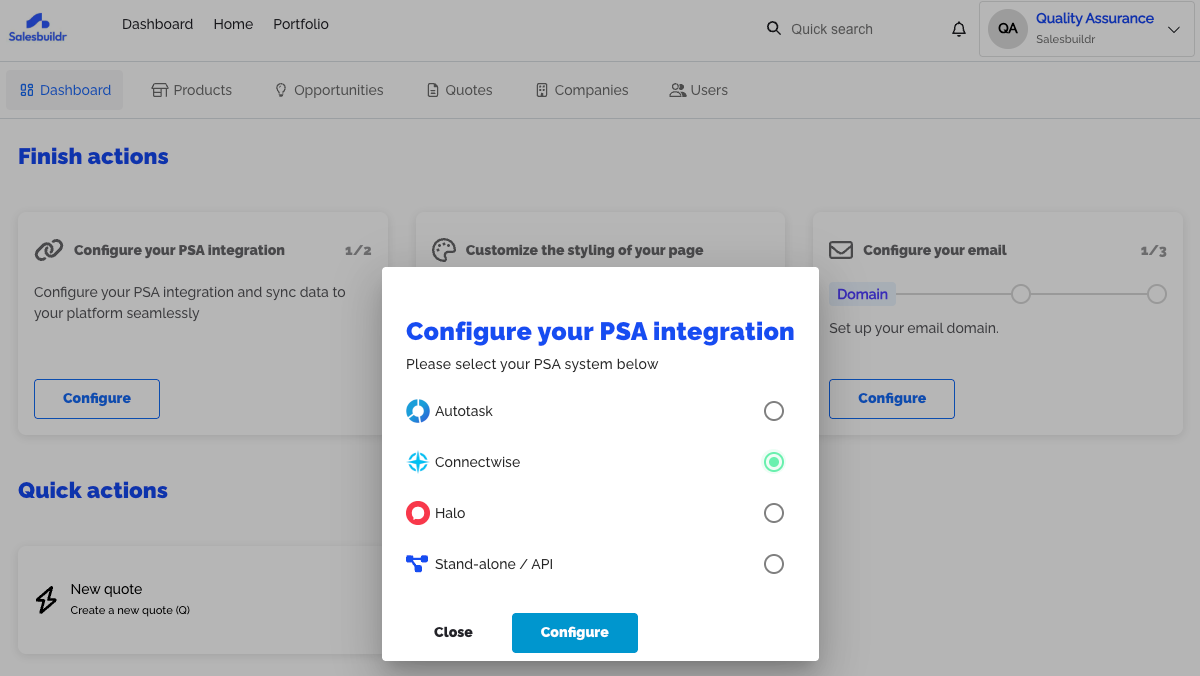
🔧 Step 1 – Connect ConnectWise
Log into your Salesbuildr Dashboard
Click the Configure your PSA Integration tile on your dashboard Alternatively, navigate to Settings > Integrations > Manage > ConnectWise

Toggle ConnectWise, then click Configure
In the window that opens, enter the following
Company ID: Your ConnectWise company identifier
Site URL: Your ConnectWise hostname (e.g.,
yourcompany.connectwise.com)Public Key: From Step 4 above
Private Key: From Step 4 above
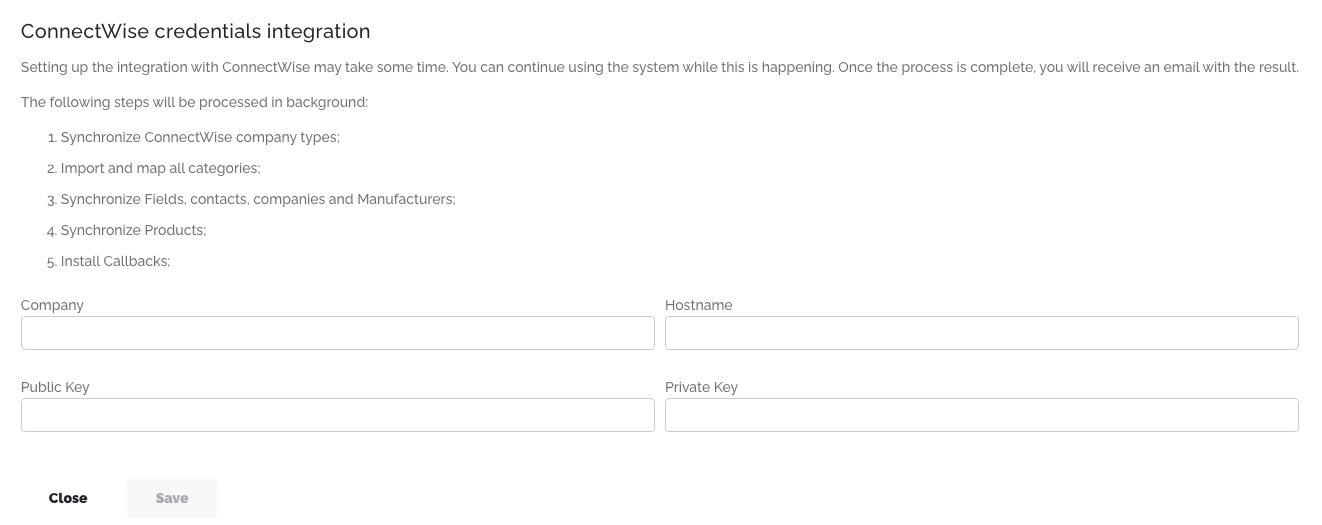
Click Save
You can also setup integration under Settings > Integrations > Manage > ConnectWise
🔧 Step 2: Complete Field Mapping
After saving your connection details, the field mapping window will open automatically. This step ensures data syncs correctly between ConnectWise and Salesbuildr.
1. Default Product Type & Shipping Configuration
Configure fallback values for product categorization and shipping handling:
Salesbuildr Default Product Type: Select your default
ConnectWise Default Product Category: Select your default
Shipping Product: Select the ConnectWise product that represents shipping costs
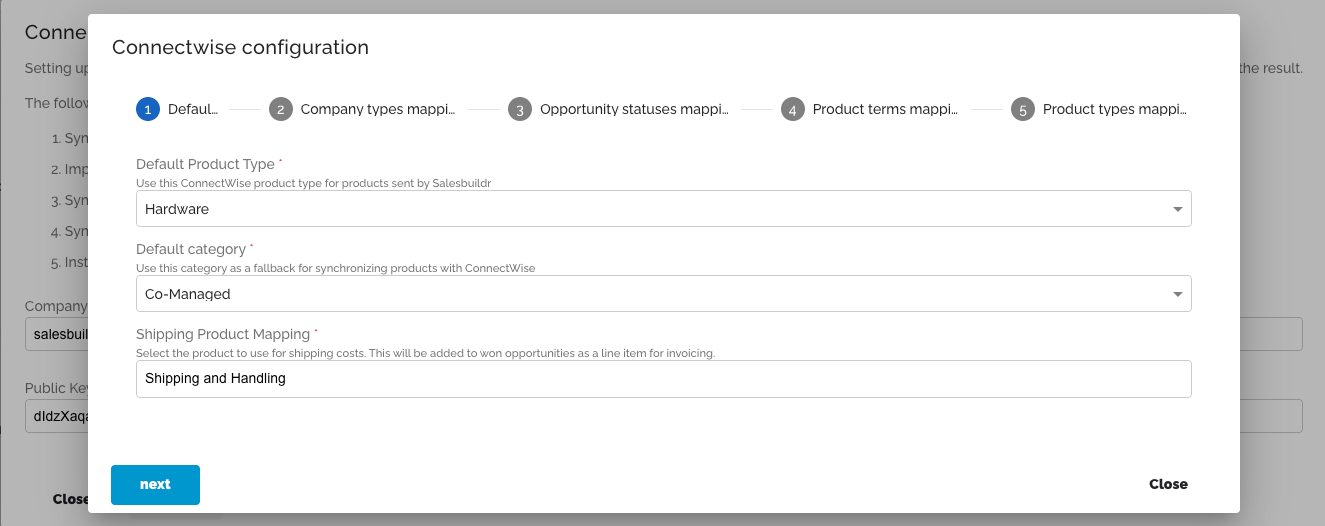
🚚 Why this matters: When you apply shipping costs in Salesbuildr, they'll automatically appear as a separate line item in ConnectWise using the product you specify here.
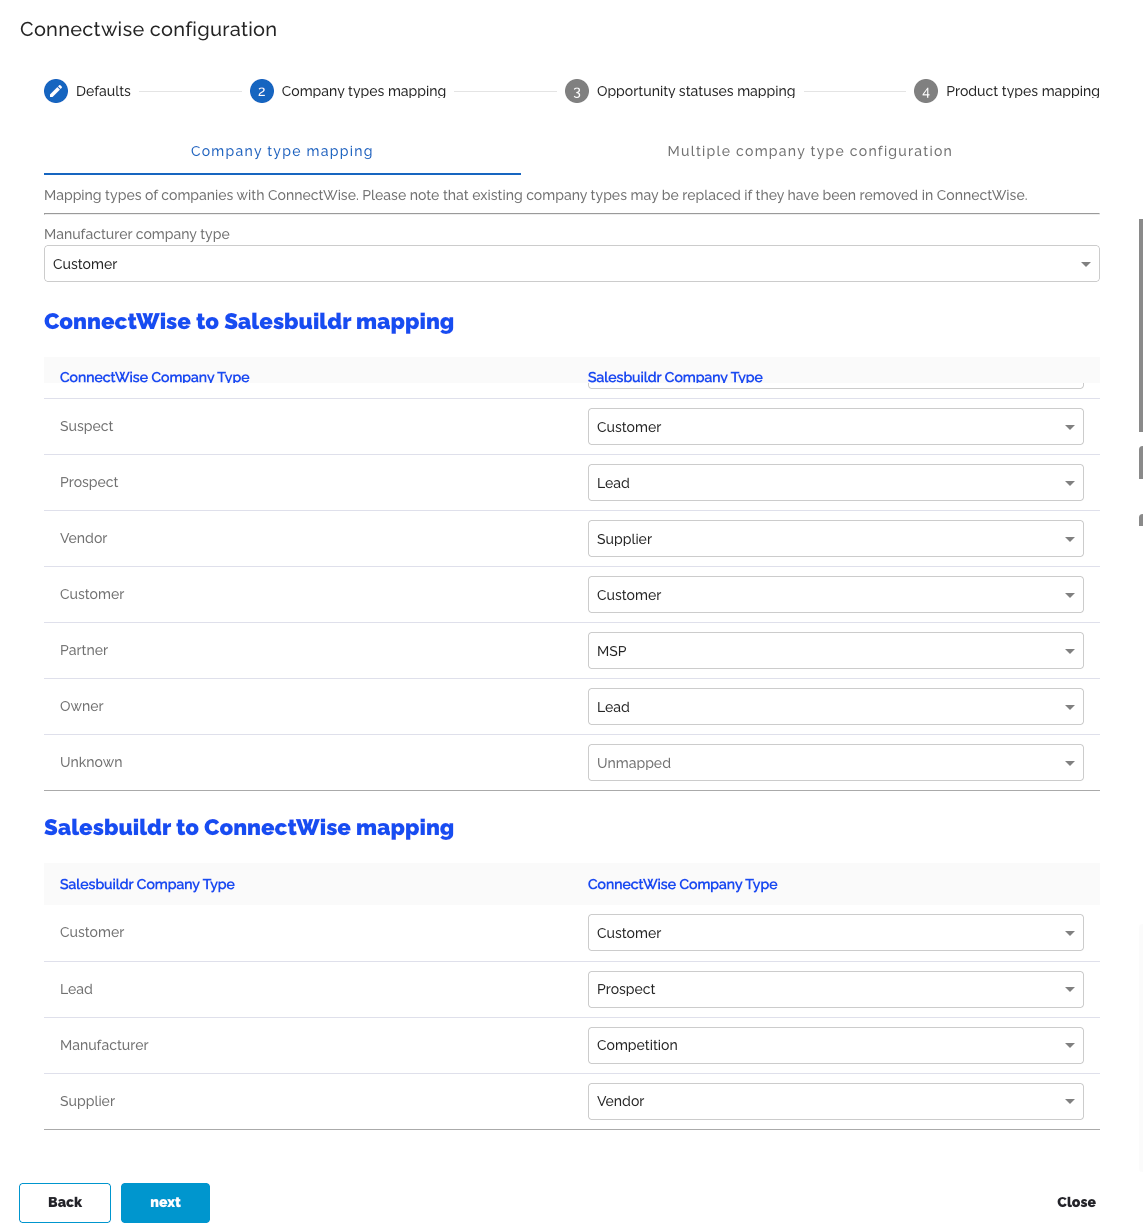
2. Company Type Mapping:
Set rules for how Salesbuildr handles companies with multiple types in ConnectWise.
Review the default company type mapping
Adjust the priority order by dragging company types
Types at the top take priority when a company has multiple types
Example: If "Customer" is #1 and "Prospect" is #2, a company marked as both will import as "Customer"
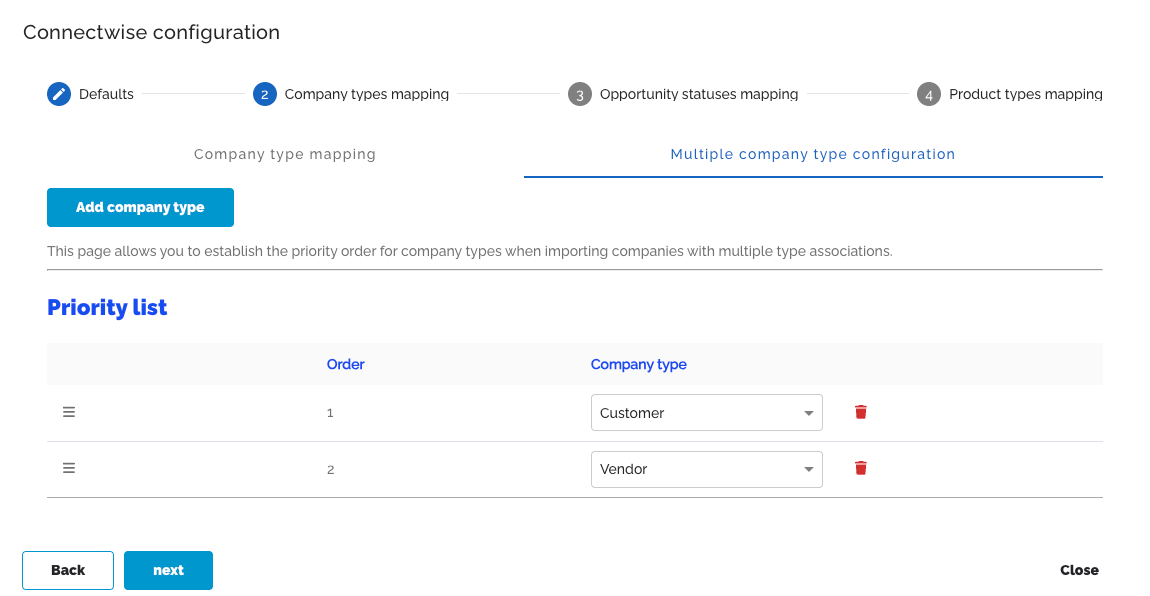
Why this matters: This prevents duplicate companies and ensures consistent company classification in Salesbuildr.
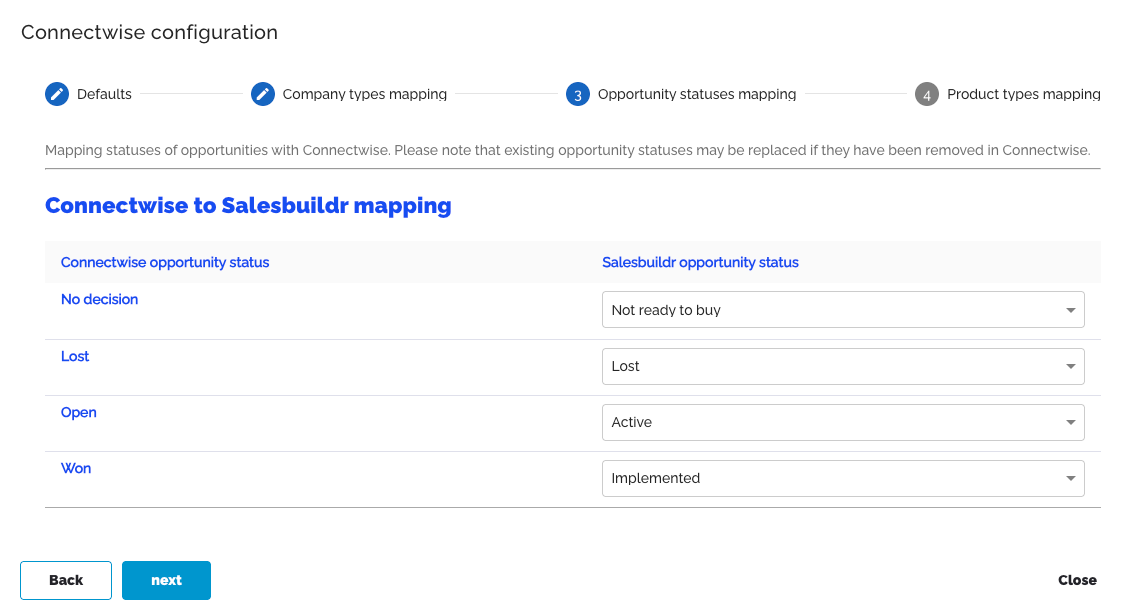
3. Opportunity Status Mapping
Map opportunity stages between the two systems to maintain consistent sales pipeline tracking.
Match each Salesbuildr opportunity status to its ConnectWise equivalent:
Lost
Open
Won
(Your custom statuses)
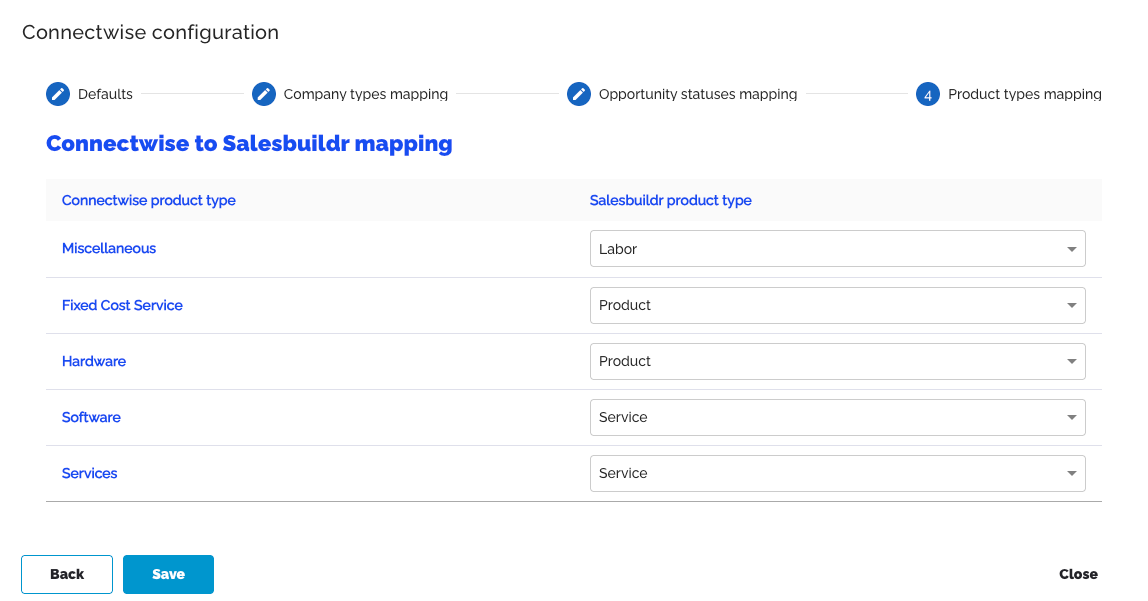
4. Product Status Mapping
Map product lifecycle stages between systems.
Match each Salesbuildr product status to its ConnectWise equivalent:
Active
Inactive
(Your custom statuses)
🔧 Step 3: Complete Initial Sync
After mapping is complete:
Click Save to begin the initial synchronization
Salesbuildr will automatically:
Sync company types from ConnectWise
Import and map product/service categories
Sync contacts, companies, and manufacturers
Import your product catalog
Install callback URLs for real-time updates
⏳ Initial sync typically takes 10-20 minutes depending on your data volume. You can continue using Salesbuildr while this runs in the background. You'll receive a notification when sync is complete.
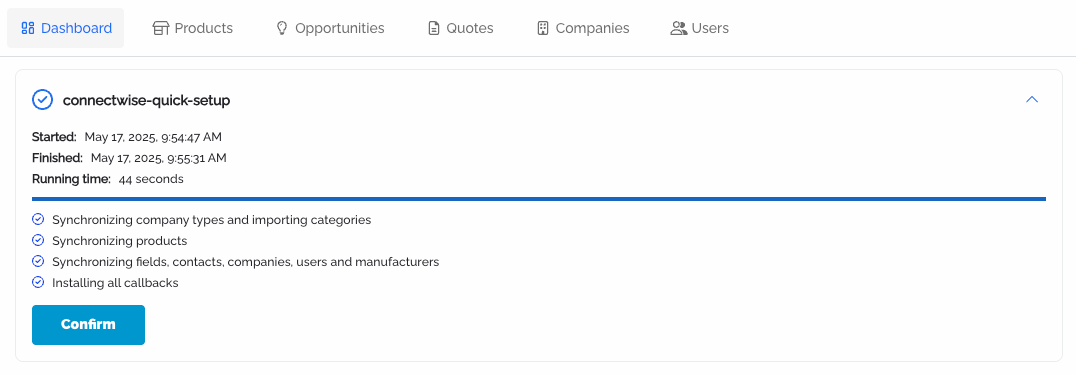
3. Click confirm once complete.
Mapping can also be done under Settings > Integrations > ConnectWise
🔧 Step 4: Verify Your Integration
Integration Checklist
Confirm the following after your initial sync completes:
Companies have synced to Salesbuildr
Contacts are visible and linked to companies
Products and services are available in your catalog
Product categories are properly structured
Test Real-Time Sync
In ConnectWise, update a contact's phone number or email
Wait 1-2 minutes
Check that the change appears in Salesbuildr
If the change doesn't appear, see Troubleshooting below
Test Quote-to-Opportunity Workflow
Create and approve a test quote in Salesbuildr
Wait 1-2 minutes
Verify the opportunity appears in ConnectWise with correct line items and pricing
If the opportunity doesn't appear, see Troubleshooting below
Managing Your Integration
Updating Field Mappings
As your business evolves, you may need to adjust how data maps between systems.
To update mappings:
Navigate to Settings > Integrations > ConnectWise
Select the mapping type you want to modify:
Categories mapping
Company type mapping
Opportunity status mapping
Product terms mapping
Product types mapping
Note: Changing mappings affects future syncs only. Historical data remains unchanged.
Manual Synchronization
While Salesbuildr syncs data automatically via webhooks, you can trigger manual syncs when needed.
When to use manual sync:
After bulk updates in ConnectWise
When troubleshooting sync issues
After changing integration settings
To refresh data on demand
To trigger a manual sync:
Go to Settings > Integrations > ConnectWise
Click Synchronize
Select the data types to sync (Companies, Products, Opportunities, etc.)
Click Start Sync
Troubleshooting Common Issues
Connection Problems
Issue: "Authentication failed" error when connecting
Solutions:
Verify your Company ID is correct
Confirm the Site URL format (e.g.,
yourcompany.connectwise.com)Check that both Public and Private keys are entered correctly
Ensure the API Member has the correct security role assigned
Issue: Some data isn't syncing
Solutions:
Check Table Setup in ConnectWise to ensure required tables are visible
Verify the API Member's security role has the necessary permissions
Review field mappings to ensure all statuses are mapped
Trigger a manual sync to refresh data
Issue: Products are missing from the catalog
Solutions:
Verify products are marked as "Active" in ConnectWise
Check that product categories are properly mapped
Ensure the API Member has access to the Product Module
Review Product Status mapping to confirm active products are mapped correctly
Need Help?
If you encounter issues not covered in this guide:
Email: support@salesbuildr.com
Chat: Use the chat widget in the bottom-right corner
What syncs
Companies — All active companies from ConnectWise Manage
Contacts — Contact records linked to synced companies
Products — Your ConnectWise product catalog with pricing
Agreements — Accepted quotes create ConnectWise agreements. Configure whether quotes create new agreements or add to existing ones.
Opportunities — Quotes are tied to opportunities. Stage progression syncs between systems.
Verify your integration
Companies have synced to Salesbuildr
Contacts are visible and linked to companies
Products and services are available in your catalog
Product categories are properly structured
Test real-time sync: Update a contact's info in ConnectWise. Wait 1-2 minutes and verify the change appears in Salesbuildr.
Test quote-to-opportunity: Create and approve a test quote in Salesbuildr. Wait 1-2 minutes and verify the opportunity appears in ConnectWise with correct line items and pricing.
Managing your integration
Updating field mappings
As your business evolves, you may need to adjust how data maps between systems. Navigate to Settings > Integrations > ConnectWise and select the mapping type to modify: Categories mapping, Company type mapping, Opportunity status mapping, Product terms mapping, or Product types mapping.
Changing mappings affects future syncs only. Historical data remains unchanged.
Manual synchronization
While Salesbuildr syncs data automatically via callback URLs, you can trigger manual syncs when needed — after bulk updates in ConnectWise, when troubleshooting sync issues, or after changing integration settings. Go to Settings > Integrations > ConnectWise, click Synchronize, select the data types to sync, and click Start Sync.
Common issues
Authentication failedVerify your Company identifier, confirm the Hostname format (e.g., yourcompany.connectwise.com), check that Public and Private keys are correct, and ensure the API Member has the correct security role.
Agreement mapping confusionConnectWise has the most complex agreement structure of the three PSAs. Understand the difference between creating a new agreement vs. an addition to an existing agreement. Review your agreement type mapping under Settings > Integrations.
Products missing from catalogVerify products are marked Active in ConnectWise, check that product categories are properly mapped, ensure the API Member has Product Module access, and review the Product Status mapping.
Some data isn't syncingCheck Table Setup in ConnectWise for all 23 visible entities. Verify the API Member's security role has the necessary permissions. Trigger a manual sync via Settings > Integrations > ConnectWise > Synchronize.
Opportunity stages not updatingVerify your stage mapping under Settings > Integrations. All opportunity board stages should be mapped. Unmapped stages will not update.
Verify your defaults
After the initial sync, Salesbuildr pre-populates some default settings — including the pipeline stage, opportunity source, and payment term. However, the quote status mapping must be configured manually. This mapping determines how quote lifecycle changes (draft, sent, approved, declined) update your ConnectWise opportunity pipeline.
Look for the Default Settings tile on your dashboard under Finish Actions, or go to Settings > Integrations. See Before Your First Call for the full setup checklist.
Next steps
Your ConnectWise integration is connected. Here's what to do next:
Return to the Provisioning Checklist to continue onboarding
Review your product catalog now that products have synced
Fine-tune field mappings and sync settings on the PSA Configuration page
Set up pricing rules and category markups