Autotask Setup
Create an API-only resource and configure security levels for the Autotask integration.
Written By Victor Raessen
Last updated 21 days ago
Part of the PSA Setup Guides. See also: ConnectWise | HaloPSA
Salesbuildr connects to the Autotask REST API. You'll need an API-only resource with the correct security level.
Prerequisites
Administrator access to Autotask
Permission to create API users and modify security levels
Access to your Salesbuildr dashboard
Step 1: Set your system account's country code
Before creating the API user, verify the country code on your system account:
In Autotask, go to CRM
Make sure the ID field is visible in the grid
Enter
0into the ID field and press EnterClick Edit on your company result
Verify the Country field is filled correctly
Click Save
Step 2: Create the API user
Go to Settings > Resources (Users)
Hover over + New and select New API User
Fill in the form:
Name: Salesbuildr API
Email: A valid company email address
Generate and save the Username and Password
Creating an API user in Autotask
Store these credentials securely — you'll enter them in Salesbuildr later.
Step 3: Set API permissions
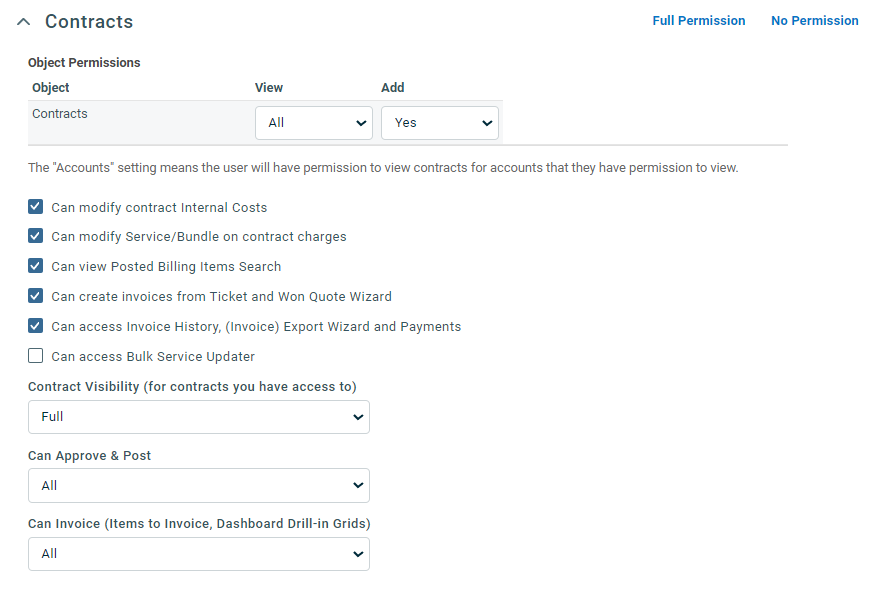
Configure permissions via Settings > Security Levels. The API user needs read/write access for these modules:
Contracts — Read and write for contract creation from quotes
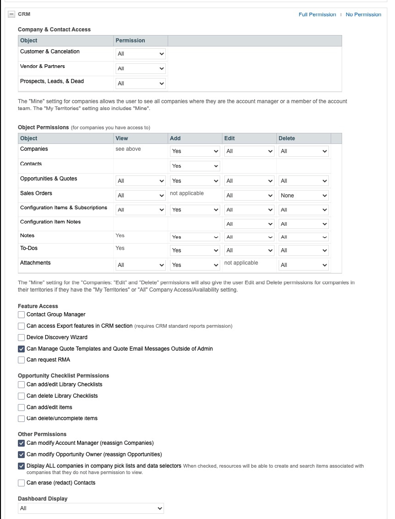
CRM — Read and write for companies and contacts
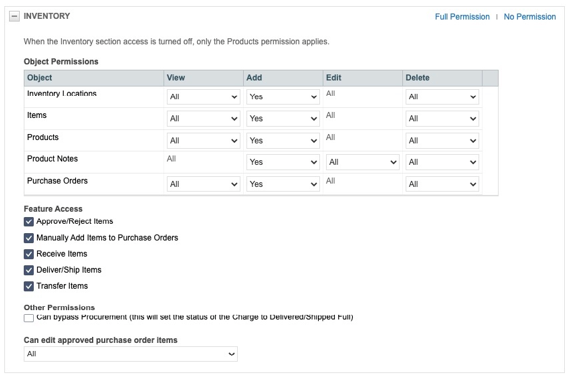
Inventory — Read and write for products
Projects — No permissions needed
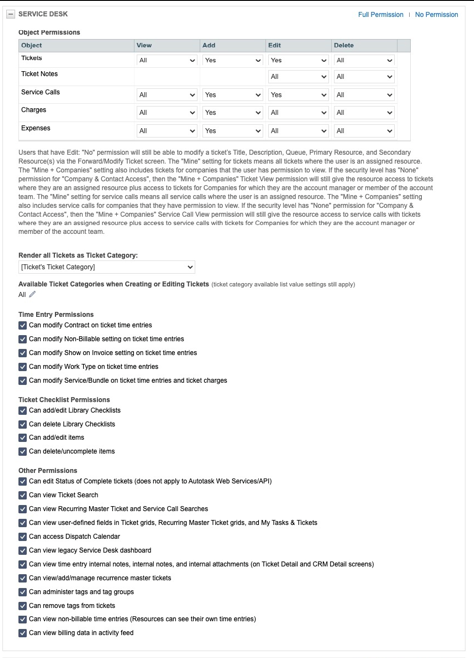
Service Desk — Read and write
Documents & Knowledge Base — No permissions needed
Timesheets — No permissions needed
Reports — No permissions needed
Admin — Read access
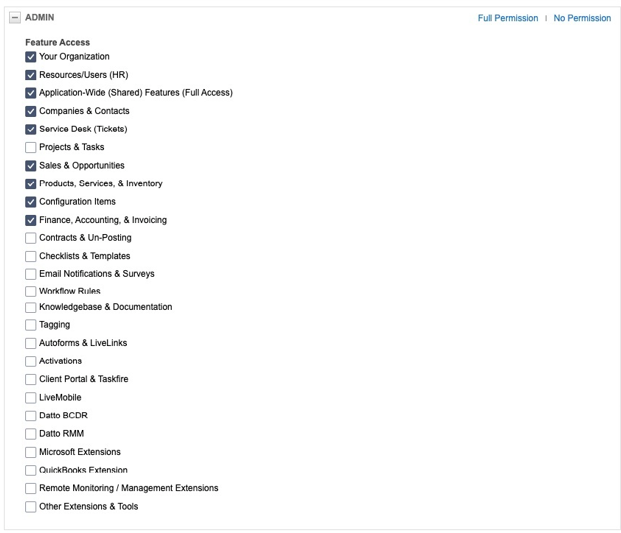
Other — Read access
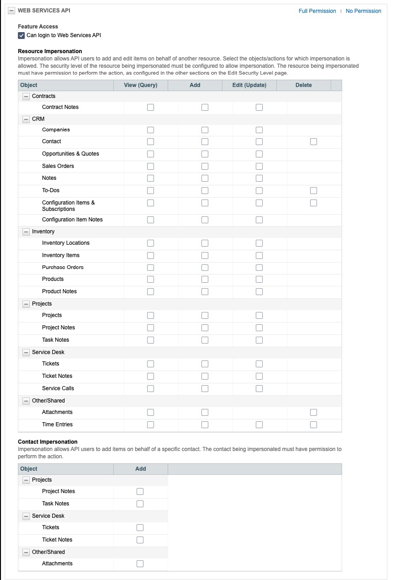
Web Services — Enable API access
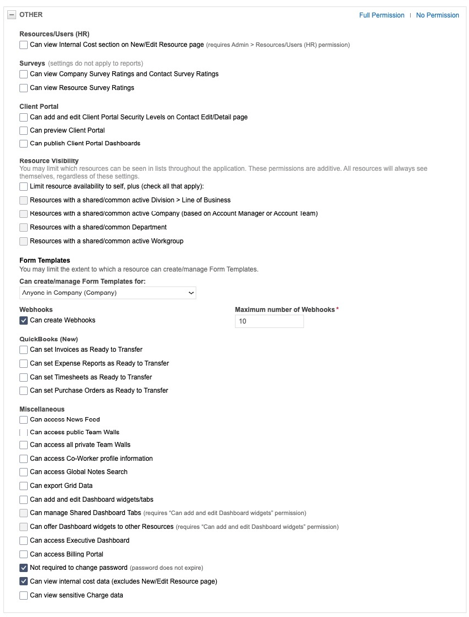
Step 4: Enable webhook support
Webhooks allow instant updates when companies and contacts change in Autotask. To enable this, create an additional security level with webhook permissions.
Go to Account Settings & Users > Resources/Users (HR) > Security Levels
Find the API User security level and click the three dots > Copy
Name it
API User + WebhooksExpand the Other section
Enable Can create webhooks (set minimum to 10)
Save and Close
Return to Resources (Users), find the API user, and click Edit
Change the Security Level to API User + Webhooks
Save and Close
Step 5: Connect in Salesbuildr
Go to your Salesbuildr Dashboard and click the Configure your PSA Integration tile
Configure PSA Integration tile on dashboard
Select Autotask, then click Configure
Select Autotask and click Configure
Enter your User Name and Secret (from Step 2)
Enter Autotask API credentials
Click Save to begin syncing. Salesbuildr will sync companies, contacts, products, services, categories, and tax info, and set up webhooks for company and contact updates. You'll receive an email once the sync is complete.
Sync complete confirmation
Click Confirm once the sync completes.
What syncs
Companies — All active companies from Autotask
Contacts — Contact records linked to synced companies
Products & Services — Your Autotask product catalog with cost and price. Services and labour are always sourced from Autotask.
Contracts — Accepted quotes create contracts in Autotask. Line items map to contract entries based on your type mappings (recurring vs. one-time).
After the initial sync, company and contact changes in Autotask are pushed to Salesbuildr in real time via webhooks. Product and service updates sync on a schedule.
Verify your integration
Companies have synced to Salesbuildr
Contacts are visible and linked to companies
Products and services are available in your catalog
Webhooks are active (check in Settings > Integrations)
Contract type mappings are configured (see PSA Configuration)
Test real-time sync: In Autotask, update a contact's phone number or email. Wait 1-2 minutes and check that the change appears in Salesbuildr.
Common issues
Connection failed Verify User Name and Secret are correct, ensure the API user is active, confirm all required permissions are enabled, and check that your Autotask system account has a country code set.
Currency or multi-currency problems Salesbuildr inherits currency settings from Autotask. If prices appear in the wrong currency, check your Autotask default currency first. For multi-currency setups, ensure your base currency is correct and price books match.
Products not appearing after sync Verify the product is set to Active in Autotask and has a product category assigned. Services and labor products are always sourced from Autotask. For hardware, consider managing those in Salesbuildr with distributor pricing feeds.
Contract type mapping issues If quotes aren't creating the right contract type in Autotask, review the contract type mapping under Settings > Integrations. Ensure recurring and one-time line items map to the expected contract types.
Data not syncing Wait for the initial sync to fully complete (check your email for confirmation). Verify the API user has "View" permissions for all required modules. In Salesbuildr, navigate to Settings > Integrations > Autotask and click Synchronize to trigger a manual sync. Check that the data exists in Autotask and isn't archived or deleted.
Webhooks not working Verify the API user has the "Can create webhooks" permission enabled. Check that the correct security level (API User + Webhooks) is assigned. In Salesbuildr, go to Settings > Integrations and confirm webhooks show as "Active". Note that webhooks only cover company and contact changes — product and service updates sync on a schedule.
Product description fields keep repopulating
If you clear a product's short or long description in Salesbuildr but it keeps reappearing, this is because the field is populated in Autotask and syncing back during the next import.
To permanently clear a description field:
1. Clear the field directly in Autotask on the product or service record2. Save the change in Autotask3. Wait for the next sync cycle to complete4. The field will now remain empty in Salesbuildr
Note: Using the "Synchronize to PSA" button in Salesbuildr pushes data to Autotask, but if the description field is already populated in Autotask, the next import will pull it back. You need to clear it at the source in Autotask.
Verify your defaults
After the initial sync, Salesbuildr automatically pre-configures your quote and opportunity defaults — including the pipeline stage, category, payment term, and quote status mapping. These are matched by name to common Autotask values (e.g. "Qualification", "Net 30").
Check the Default Settings tile on your dashboard to confirm all values are correct. If any defaults could not be matched automatically, the tile will prompt you to configure them. See Before Your First Call for the full setup checklist.
Next steps
Your Autotask integration is connected. Here's what to do next:
Return to the Provisioning Checklist to continue onboarding
Review your product catalog now that products have synced
Configure ongoing integration settings on the PSA Configuration page
Set up pricing rules and category markups